skip to main |
skip to sidebar
11:10 PM
Edit This
This past Saturday, my dad and big brother installed the second set of French doors in my house. The first set of doors were installed in the master bedroom, and this set went into the dining room area, opening out into the side yard.  ^ how it started - as a double window
 ^ glass removed, taking out/moving the electrical wiring
 ^ taking out the wall below the original window
 ^ view from the side yard (which will eventually be filled with greenery and turned into a garden area)
 ^ large hole in the wall (AH!)
 ^ installing the door
 ^ done! well...almost...
11:02 PM
Edit This
Tonight (Monday) we got a little bit farther on the flooring. It took a little bit of extra time to make sure the flooring didn't move, and that the main lines stayed centered, but we made some progress and have started figuring out a rhythm. Hopefully tomorrow night we will be able to accomplish even more. ^ looking from the back towards the front door
 ^ looking at the "sitting area" from the dining room
10:55 PM
Edit This
Sunday night we FINALLY started laying the new laminate flooring... after a bit more prep work that is (grinding the remaining glue off the ground and lots of vacuuming and cleaning). The first night we only worked a little bit as we got a late start and needed to get a feel for how this flooring works. So this is all we got done the first night...
10:24 PM
Edit This
We finally finished the prep work in the living area and were able to paint. We finished painting the ceiling last weekend, and throughout the week and this Saturday we finished up the paint. The light gray we used on the ceiling we also brought down to the tops of the walls. We used a darker gray in the "dining room" area and then used a yellow in the kitchen and "sitting area." The light gray continues over all the ceiling to make the rooms more cohesive. Where the light gray meets the darker gray and yellow, there will eventually be a white molding (much like a chair rail but higher up)...once the accessories and furniture are in, everything will flow together even better. (The pictures were taken before we finished cutting in the paint around the edges and I forgot to take a picture of the kitchen...but you get the idea.)
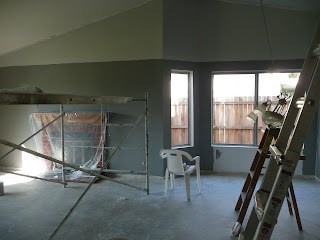
^ light & dark grays

^ light & dark grays (the wall dividing the "dining room" and kitchen)
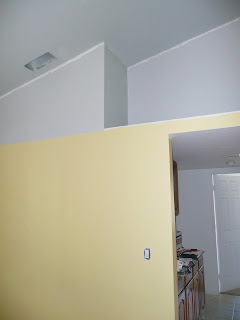
^ light gray & yellow

^ light gray & yellow in the "sitting area"
10:15 PM
Edit This
A quick post just to show the finished canister lights, with the trim and lights all in place. If you look back at my previous post about the lights, you can see what a difference the new lights make and how far they've come. My dad's hard work all paid off! The lights alone help modernize the kitchen.
10:26 PM
Edit This
This past week and weekend we tackled the next steps on the living area ceiling... The ceiling had already been scraped, mudded, and sanded so it was timing for priming and painting. ^ Jen helped prime the ceiling as I was finishing up some last bits of sanding
 ^ the start of the first coat of ceiling paint - it's a light gray, and although it looks dark in this picture, once the whole ceiling was painted it really doesn't look dark at all, and you can barely tell it's not white.
 ^ Ceiling finished being painted. We've finished up the 2 coats and have prepped the walls for painting...that's the next step...
10:09 PM
Edit This
I bought my very first power tool this weekend...and not just a drill or anything small like that - but a true power tool. I bought a DeWalt DW715 Heavy-Duty 15-Amp 12-Inch Compound Miter Saw. After my dad and I looked around at miter saws at Lowes and Home Depot, I ended up buying this saw at Costco (of course). My dad and I had seen it there before, and on Sunday we were back at Costco and went to look at the saw again. The display saw was the last one remaining and because it was the floor model it was discounted from the original price - so we snatched it up! This saw will get a LOT of use once it comes time to put in the flooring, base boards, molding, etc...

10:06 PM
Edit This
The first set of double French doors were installed on Tuesday. We replaced the sliding glass door off the master bedroom with a custom double French door. My dad and Bob worked hard for hours getting the door all lined up and in the right place - not an easy task. Another set of the same double doors will eventually be put in off the dining room and a single door (of the same style) will replace the current patio door off the kitchen.  ^original sliding glass door
 ^no door!
 ^making sure the doors lined up
 ^installing the hardware
 ^Yay for pretty new doors!!!(Molding will eventually be placed around the door in order to hide the seams and seal everything up)
9:38 PM
Edit This
We decided to tackle the project of putting in canister/recessed lighting in the kitchen area. My dad did most of the work and received some help/guidance from a few friends (thanks to both Bobs!). Not only did my dad have to put in new lights, run wires, etc, he also had to take out the old lights, drywall the newly empty space and then mud it to match the rest of the ceiling. It was a lot of work, but we learned a lot about electrical work and the end result has made a drastic change in updating the kitchen. I can't wait to see the finished product once the ceiling is painted and the lights are in! Below is the progress from what we started with to what it looks like now... ^the original lighting
 ^taking out the old lights
 ^running wiring
 ^installing drywall in the raised spaces
 ^mudding the drywall
 ^extra mudding to even everything out
10:18 PM
Edit This
It was long awaited, but yesterday we were finally able to put paint on the walls of my bedroom. Jen and Susie came to help me, and between the 3 of us, we got the whole bedroom painted! Some of the walls still need a second coat, but at least they all have color on them. I have 2 brown accent walls, and the rest of the walls are blue... ^Jen putting the first paint on the walls
 ^Susie working on the bathroom - I'm too short to reach those parts!
 ^Susie painting in the awkward parts of the room
 ^Jen is concentrating very hard in getting the second coat on the edges done perfectly
 ^Yay for color!!! (the white spots are just from my camera, they aren't actually on the wall)
 ^So proud of the work we accomplished in just one afternoon. Thanks girls! You're the best!!!
9:45 PM
Edit This
After scraping all the "popcorn" off the ceiling, my dad mudded all the joints in order to create a smooth ceiling. After the mud dried, we had to sand the entire ceiling(s) in order to make sure there were no ridges or bumps...this was a long and hard process. Sanding created SO MUCH dust...ceiling dust...here's a look at the process.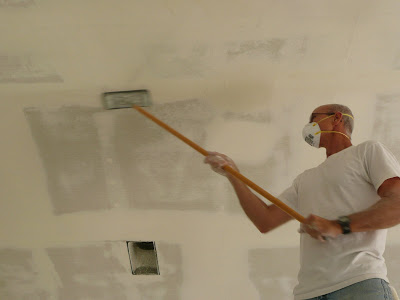
^My dad scraping the ceilings
^This is what I looked like almost every day for over a week. Head to toe covered in white dust!
^Sealing/priming the ceilings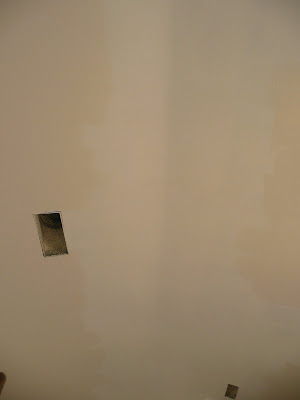
^If you look closely, you can see the parts of the ceiling that is painted and the parts that only have primer. We have scraped, mudded, sanded, primed and painted the ceiling of my bedroom. Finally!
9:47 PM
Edit This
My parents and I took advantage of having Memorial Day off of work, and spent the day working on my house. Frank Mann stopped by to give a helping hand as well as some good advice (Thanks Frank!!!). We accomplished a few little things that day, but the most notable thing we did was finish removing the wall in the living area... ^ My dad cutting the wall so we don't tear the part of the drywall we want to keep.
 ^Removing some electrical outlets/switches covers
 ^Frank and dad figuring out what to do with all the extra electrical wires.
 ^Taking car of the electrical stuff :)
 ^The view from the front door...removing the wall really opened up the living space.
 ^Looking toward the front of the house...


